
In this build step, we start the routing of the control cavity.
Below: Tools to be used.
A drill, screw gun, router, 3 router bits, 1 chamfer bit, center punch and 4 pick guard screws. Note that the body is clamped to table.

Below: A closer look at the bits to be used. While you can use whatever bit lengths you are comfortable with, seen below are a 0.25-inch bit, 0.75-inch bit and a 1.25-inch bit. In other words, “small,” “medium” and “large.” These bits are used for the three stages of this particular route. The shortest is used for the first few passes, then the medium, then finally the large. The short-to-long order is used because no one bit would work for all the route depths needed for this job.

Below: Centerpunching holes for pick guard screws.

Below: Drilling the holes. The piece of tape is on the bit as a marker so we know when to stop drilling.

Below: Using the chamfer bit to finalize the screw hole. This is not a required, but it’s generally good practice to do this anyway as a preventative maintenance step. For example, holes that are chamfered can prevent finish cracking later on from screws being inserted or removed.

Below: Screwing the template on to the body. Ordinarily, double-stick tape would be used, but since the guard will be screwed down anyway later on, it is okay for the template to be directly attached to the plan. Screwing down this template also assures a fit that will not move while it is in use.

Below: Adjusting the depth of the router bit for the first cut. This is an extra piece of template material held up against fence of router base, showing how the bit is adjusted. The cutter head is seen just reaching the surface, and this is done so we can see what we’re doing better.


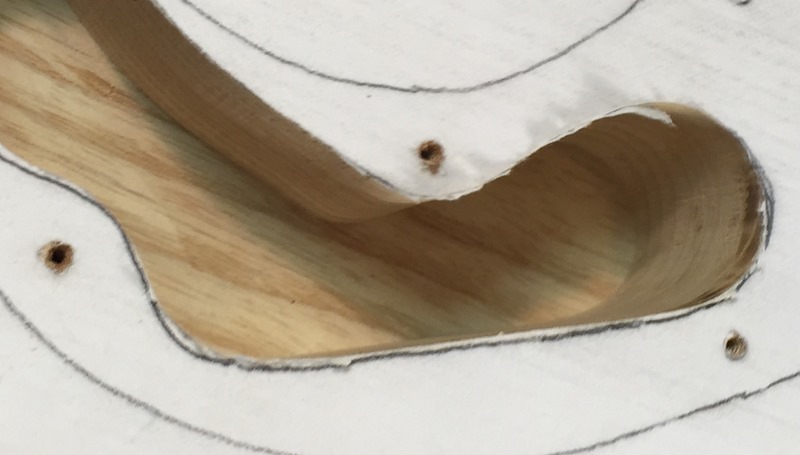
Below: Routing the first pass.

Part 2 coming soon!
Where are the rest of the build steps?
You can view them all here.

I think it’s a pretty common/standard practice to remove most of the cavity material with a drill press and forstner bit, so as to reduce the work done by the router and router bit. The thinking is that A) forstner bits are cheaper than router bits so it’s not as big a deal if they wear out or break sooner, and B) if the router bit breaks from overheating and overloading, it can do a lot of damage to the instrument and the person holding the router.