Radiusing a neck can be done in a number ways. But generally speaking, there are two major methods. The expensive way and the cheap way.
Expensive way – Use a machine to radius the neck


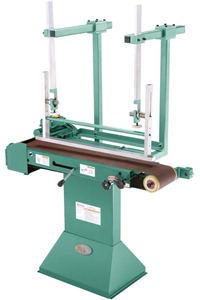
The above is the Grizzly G0574 Guitar Fretboard Radiusing Sander. Not cheap, but very nice to have. It’s a good time-saver and has the additional feature of being able to cut a compound radius whereas with radiusing blocks you are only allowed a single radius.
Important note: The starting radius of this machine is 10″, so if you want the vintage 7.25″, it can’t be done using the Grizzly.
Cheaper way – Use radiusing blocks


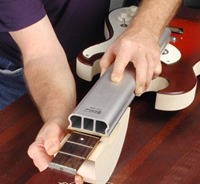
The above is an aluminum radius-sanding beam from Stewart-McDonald. It is OK to call it a block even though it’s not a block, as that is tradition.
These beams do allow you sand a radius anywhere from 7.25″ all the way to a very flat 20″. If you bought every single beam available, it would cost more than the Grizzly machine. However, it’s very unlikely you will buy every beam simply because you don’t need them all, so in the end, buying beams is cheaper than the machine.
The only bad part about sanding beams is removing and replacing the PSA (pressure sensitive adhesive) sanding material, as that can be a bit annoying to deal with. However, there is a trick you can use to make changing out the sanding material very easy, which will be mentioned in a moment.
PSA sanding material on blocks can wear out and is not cheap to replace. If you are radiusing a very hard wood species, such as ebony, you will be going through several sheets.
Note that the use of radiusing blocks does not guarantee a perfect form. This is because you, as in the human, are forming a piece of wood and not having a machine doing it, and humans sometimes makes mistakes. As with any manual sanding method, experience is the best teacher here. You may make mistakes at first, and that’s normal. But over time you will get better at it.
How much time will it take?
If using the Grizzly machine, assuming the operator is using the machine correctly, the radiusing will take about 10 to 15 minutes.
If using radiusing blocks, usually a minimum of one hour hard labor. However, this is not to say you should radius your neck all in one go. Do as much as your body will allow without injuring yourself, and if need be, take as much time as you need to complete the work properly.
Tip on using PSA abrasives
The adhesive on PSA abrasives is designed to be incredibly strong and is therefore difficult to remove; it almost never comes off in one piece, and industrial solvents and razors are usually required just to remove the sandpaper, potentially causing a big mess.
To avoid agony and misery from removing PSA abrasive, it is recommended you line the bed of your radiusing block with Tesa 4298 packing tape first before laying down a new PSA sanding strip. This will not only allow the PSA strip to be removed cleanly when you need to, but also allow you to use it again, should you wish to do so.
The excellent tip on lining a sanding beam bed with 4298 tape comes from John McGuire, who has been building guitars a very long time and very much knows what he’s doing when it comes to these sort of things. 🙂
Where are the rest of the build steps?
You can view them all here.


Is it absolutely necessary to radius a fretboard?The reason I ask is that I have replaced the fretless ebony fingerboard, which was flat,with a slotted ebony fingerboard, so I am used to playing with a flat board.
I am planning to build a 5 string fretless bass soon. Should I radius the fingerboard or not? I am used to a five string with a 12 inch radius . Leaving it flat would save some work and expense that could be spent on better components.